Dried Apple Head Dolls

The fall reminds me of a craft we used to do when I was little. We used to turn this:

into these:


OK, truth be told ours never looked that good.  I haven't done this in years so I decided to go looking for some good directions.  There is a great site (where these pictures came from) that has excellent step by step directions so rather than rehash the whole thing - here are two options:

Super detailed instructions at http://www.appledolls.org/

or less detailed instructions at ehow.com

Enjoy drying apples!

  • Digg
  • Del.icio.us
  • StumbleUpon
  • Reddit
  • RSS
Read Comments

GHOSTED!


Its that time of year again - whatch out for those ghosties!!!  This is a great game to play in your neighborhood.  Here is how it works...

1. Print out the pdf found here. (it should print out two pages)

2. Bake some treats (ideally Halloween in theme)

3. Make 2 plates of treats and tape a ghost to each one.

 4. Deliver the plates to unsuspecting neighbors.

5. You can knock and run - or just leave them and hope they find them in the morning!

6. You can tape the ghost to your door so you don't have to make more treats.


Here is the text of the poem:


You’ve been Ghosted!
Late last night, we left you a treat.
The tradition is fun, one we hope you’ll repeat.
Take the ghost and pin it on your door,
To let others know, you need be ghosted no more.
Now it’s your duty to pass on the surprise,
To two more families, we must advise.
Gather some treats and deliver them soon,
Within two nights, under the light of the moon.
Include a ghost with each package you give,
Along with this poem for the tradition to live.

  • Digg
  • Del.icio.us
  • StumbleUpon
  • Reddit
  • RSS
Read Comments

Halloween "Printables" and Coloring pages

Follow this link for printables (with instructions) for a few halloween activities.

  • Digg
  • Del.icio.us
  • StumbleUpon
  • Reddit
  • RSS
Read Comments

Fall paper printables

Found this site with a few fall oriented printable pages - some are colorable.  Could make a great afternoon activity for the family!

Fall Printables!

  • Digg
  • Del.icio.us
  • StumbleUpon
  • Reddit
  • RSS
Read Comments

Paper Plate Jack-O'-Lantern

You can make these pumpkins to decorate your house for Halloween.  They are easy and fun for kids to help with.


What you'll need:
  • Mini paper plate 
  • Orange acrylic craft paint
  • Yellow craft foam
  • Green craft foam
  • Brown craft foam
  • Scissors
  • Glue

 How to make it:


1. Place the paper plate upside down on your work surface and paint it orange. Set aside to dry and repeat with a second coat if needed.


2. Cut out facial shapes (triangles for eyes and a mouth with a few missing teeth) and glue to the plate.


3. Use scissors to trim the plate into a pumpkin-like shape. Do this by cutting a dip in the top where the stem would be and trim the bottom to flatten it a bit.


4. Cut two simple oval-shaped leaves from green craft foam and glue to back of the plate at the top of the pumpkin.


5. Cut a simple rectangular stem from brown craft foam and glue to the back of the plate, between the leaves.

  • Digg
  • Del.icio.us
  • StumbleUpon
  • Reddit
  • RSS
Read Comments

Milk Jug Skeleton

I remember having one of these growing up!  Easy to make but fun for the kids.


There are instructions all over for these things.  There is a link to an easy how-to at hphood.com.

Here are some written out (thanks to prairiewebs.com)

What You Need:
8 - 9 clean plastic gallon milk jugs
String
Scissors & craft knife
Glue gun
One-hole punch

SKELETON HEAD: Turn a milk jug upside down In the corner opposite the handle cut out a large pair of eyes, the mouth and two holes for the nostrils.
Make two small slits in the top of the head and tie a loop of string through them to hang the finished skeleton.

SKELETON CHEST: Slice down the centre of a jug - opposite the handle. Cut the plastic to make a rib cage. Glue the head and chest together with hot glue.

SKELETON SHOULDERS: Cut off two jug handles leaving a small collar on each end. Use hot glue to attach them to the chest section. Punch a hole at the outside end of each shoulder.

SKELETON WAIST: Cut out two spouts, leaving a 1/2 inch collar on each. Hot glue the spouts together. Glue to the bottom of the chest.

SKELETON HIPS: Use the bottom 4 1/2 inches of a jug. Cut into a pelvic shape. Glue to the bottom of the waist.

SKELETON ARMS & LEGS: Cut the bone shapes from the jugs. Tie to the shoulders and hips.

SKELETON HANDS & FEET: Trace the kid's hands and feet. Cut these shapes out of the jugs. Punch holes into the hands and feet and tie them onto the arms and legs.

For a greater effect you can paint Mr. Bones a neon color or with "glow in dark" paint so that he will glow as he greets your Halloween guests

  • Digg
  • Del.icio.us
  • StumbleUpon
  • Reddit
  • RSS
Read Comments

Cute Scarecrow - "Plant Poke"


I'll just post a link to this one so you guys can see it there!
CraftIdeas.com Plant Poke

  • Digg
  • Del.icio.us
  • StumbleUpon
  • Reddit
  • RSS
Read Comments

Pumpkin Jar


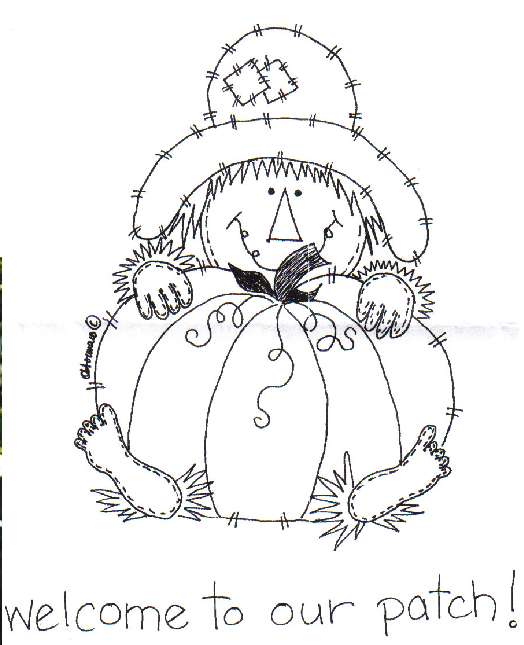
This scarecrow with a pumpkin is a great fall decoration! 

What you need:
Glass Jar
Liner and Shader Brushes
Micron Black Craft Pen
Old Toothbrush
Acrylic Matte Spray
Blank Scarecrow Image

Acrylic paint colors used in the image:
Antique White, AC Flesh, Pumpkin, Tangerine, Georgia Clay, Pink Quartz, Bonnie Blue, Trail Tan, Yellow, Dark Forest Green, White, Black

 Instructions:

Base coat surface with 2-3 coats of Antique White.

Trace pattern onto base coated surface.

Paint pumpkin with Pumpkin paint. Shade lines with Tangerine and Georgia Clay.

Paint face, hands and feet with AC Flesh. Paint nose with Georgia Clay and shade with Black. Draw on mouth eyes and stitches with Micron craft pen. Use ratty or scruffy brush to dot on cheeks with Pink Quartz.

Paint hat with Bonnie Blue. Mix a very small amount of black with Bonnie Blue to use for shading hat. Patches are Trail Tan, criss-cross with Georgia Clay.

Paint pumpkin stem and vines with Dark Forest Green.

Use fine liner brush with Yellow and Georgia Clay for straw around feet, hands and face.

Use Micron craft pen to draw on all stitches around hat and pumpkin.

Splatter completed surface with White and then with Black using the bristles of an old toothbrush.

Sign your work! Spray your completed project with 2-3 coats of acrylic spray sealer according to directions on can.

Tip: If you are painting on jars, prepare your surface by washing the jar, completely removing all labels and glue, then giving the jar a rinse in white vinegar or rubbing alcohol. Allow the first coat of base to dry completely before attempting second coat!

This post was found at AllFreeCrafts.com and was originally designed by Amanda Formaro - Amanda is the entrepreneurial mother of four children. She is also the owner of FamilyCorner.com Magazine.

  • Digg
  • Del.icio.us
  • StumbleUpon
  • Reddit
  • RSS
Read Comments

Fall Craft Ideas

Welcome all!

I wanted to setup a simple place where I could collect craft ideas from lots of different people and share them! I thought I'd start with a fall theme - but anything will be great!  If you have any please feel free to share images and how-to articles by sending an email to craftlyblog@gmail.com. I'll try to get the information you send in up as soon as I can! If I get a lot of stuff it will definitely have to be spread over time but that would be a great problem to have!.

  • Digg
  • Del.icio.us
  • StumbleUpon
  • Reddit
  • RSS
Read Comments